How to Customize Navigation Menu to your WebsFB Site - New Feature Release
September 28 - 4 year before
The navigation of your website is a crucial part of the site, and it must work to ensure that users can navigate between different sections. If you don't have effective navigation then potential customers might not be able figure out where they are or what other options there may be for them while browsing through your pages.
Website visitors first want answers like "Where am I?" when arriving on an unfamiliar page; secondly ask oneself if this content will also answer some questions ("Is there anything else here related with my search query?"), as well as why did we come here so far (do we remember?). Another thing people do before leaving usually asks “What should I read next?",
These questions should be visibly answerable through the proper navigational structure. The valuable sale, however, can be reinforced with high probability via a proper website navigation structure.
WebsFB users can design transparent and organized navigation that may work as a road map for the site visitors. You can give easy navigation to your site visitors so that they can explore your product and service and get confidence in your brand.
How You Can Easily Update WebsFB Website Navigation?
WebsFB users can edit the site navigation at any time. They can enhance site usability through good navigation. So, if you want to know how to edit your website navigation then you are reading the right post. Here in this step-by-step tutorial, we will explain how even a no coding background person can easily edit their website navigation.
Setp1- Login to the Account
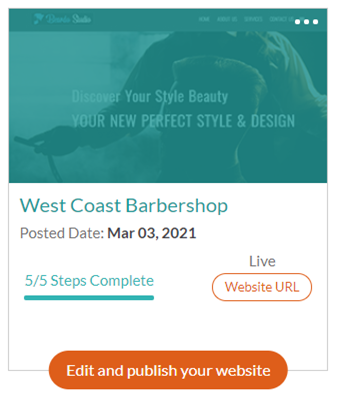
To start with website navigation, edit just login to your admin account. From there you will be redirected to the account page. As shown in the following image when you will click on the “Edit and publish your website” then you will be redirected to the next page.
Step2.1 - Click on the edit navigation option to edit your menu item as shown in the picture.

Once you click on the option it will open the navigation editor as shown below:

For further information about how you can edit go directly to Step 4- Editing Website Navigation
Step 2.2 - Click on the “All Features” button
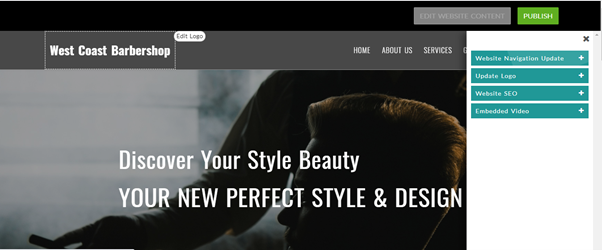
Now after logging into the site you will be redirected to the edit page of the website. From here you can click on the “All Features” label from where you will get the option to edit several sections of the web page. Now go to the next step.

Step3- Click on the "Website Navigation Update" option from the menu
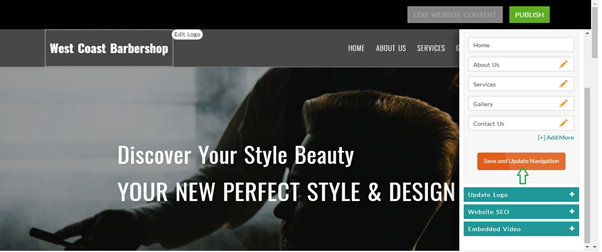
Now to edit the website navigation you will have to choose the option “Website Navigation Update”. There you can see four more options along with this navigation option like “Update Logo”, “Website SEO” and “Embedded Video”. From here just click the first option to update website navigation.
Step4- Editing Website Navigation
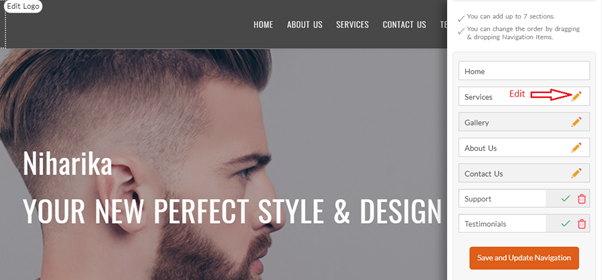
Now from here, you will be redirected to the website navigation update section. Users can add up to 7 sections at max in the menu among which the first “Home” page section is a must. You can make the following three types of navigational updates:
- Hide or Show the Feature
- Changing Order
- Navigation Relabelling
Let us see how they can be used to update the site navigation?
- Hide or Show the Feature
The hide or Show feature enables you in making the feature visible or hidden from the site. The feature is not available for the “Home” page section, but you can anytime hide or show the following four sections as shown in the image. By clicking on the “eye” icon you can either “Hide or Show” the corresponding section from the site. Now go to Step 5.

Pro Tip: Two extra sections can be added and deleted from the site by clicking on the “Delete” button
- Altering Navigation Order
The navigation order can provide a higher engagement rate. Analyze and determine the imperative categories of your service. Depending on the result place them either at prior or later position. This can be done just through drag and drop. The ordering of the menu items can be changed if required. To change the order of the menu items, drag and drop them one above another. Now you can go to Step 5.
- Navigation Relabelling
The menu text can be altered. The text on the menu can be changed at any time. For this just click on the “Edit” icon like shown in the image and then a cursor will start blinking through that you can change the text on the menu. Now go to Step 5.
Step5- Saving the Changes
When you are done with the navigational changes now the final step is to click the “Save and Update Navigation” button. All or any changes made in step 4 will only take place when you will click on this button. So do not forget to click on the “Save and Update Navigation” button.
So, keep your site visitors happy and let them explore the hidden treasure of your website. Effective and organized website navigation can improve site usability and search engine accessibility as well.
If you’re ready to edit your website navigation, click here to get started now.
WebsFB is committed to making the web a better place for everyone. These are just some of the ways our dedicated design team has worked to improve our products for our users, and visitors to their sites.
If you know ways to improve our website builder platform or have a feature that you’d like to see, we encourage you to reach out at: contact@websfb.com
Related Posts


-
Subscribe to Stay Updated with Latest News
Easy 7 steps for build your website.

Select Template
Choose Color
Add Logo
Add Navigation
Setup Account
Add Content
Go LIVE!
Categories
- Blogging Platform (1)
- Business (26)
- Development (24)
- Email Marketing (8)
- Graphic Design Trends (4)
- Hosting Platforms (1)
- How To's (18)
- Ideas and Inspiration (3)
- Inspiration Technology (5)
- Management (2)
- Marketing (38)
- New Features (10)
- News (25)
- Online Advertising (3)
- Promote Your Website (27)
- Search Engine Optimization (8)
- Security (4)
- Small Business Tips (43)
- Social Media (6)
- Uncategorized (2)
- User Experience (3)
- Web Design (42)